Wednesday 14 November 2007

Playing Catch-up with the Dares

I have decided to revist my blog and found this un-published post I started writing in November! So I thought I might as well stick it up as part of my new year attempt to keep up with this blogging lark!

Well, another long gap between blog posts. Perhaps I'll make a new year's resolution to blog more regularly! Anyway I have been keeping up with the happenings over on Daring Card Makers, and I've even done a couple of the dares! By the time I've got round to updating my blog I am still a week behind. (edit - now nearly two months!!!)

First up is last week's from the incredibly talented Jo Kill:

Hi all :) This week it is Jo here to set the dare...
I seem to have developed a little bit of a fixation with old cardboard boxes....! My dare this week is to use some corrugated card on your card - it could be corrugated craft card or an old box etc. taken to pieces :) You could make the card blank from it or die cut shapes etc...

I am a big fan of using corrugated card on my projects, and I am also a frequent customer of over-priced coffee shops which means I usually have a stash of these on my craft table:


I had a fortieth birthday card to do (a dreaded man card - so hard to do). I had aready started
playing with the corrugated bits of card a couple of days before , but Jo's Dare gave me the incentive to actually do the card. This is what I came up with (colours are a bit weird on the 1st pic, sorry)


I used the coffee wrapper for background and the smaller star. The larger star is fab freebie paper by Kirsty Wiseman. The bottle cap embellishment is home-made. I flattened the cap with a hammer, made the centre logo in word and then covered it with glossy accents.

I decided that corrugated stars is the way forward for men's (and boy's cards) and came up with this for a friend's son's birthday which was last week:


He is Thomas the Tank Engine mad. I made the chipboard Thomas using the cuttlebug train die, cut from chipboard and designed the 'paint job' in photoshop. The card (including the red corrugated for the stars) is from the Paper Mill Shop. The blue background is embossed using a Cuttlebug folder.

Going back, the previous week's dare was set by Tracie.

This week its Tracie setting the dare and it is to make a card and CUT! Any theme goes, so for those of you needing a break from Christmas crafting this is the perfect opportunity to have a change. All styles are welcome but there MUST be an element of handcutting somewhere. It could be a greeting, a shape, letters printed on your pc and handcut, anything goes as long as you did it by hand.

Well I'm not too hot with a pair of scissors, so I thought I would keep it simple and opt for some triangle Chritsmas trees.

BY THE TIME I GOT ROUND TO POSTING THIS I'VE LOST THE PHOTOS --------------arrrghhhhh!

Friday 21 September 2007

Her Space:My Space

Her Space: My Space is a photography challenge blog with daily word prompts. I love looking at the prompts and what people come up with but I've never joined in (until now). Today's prompt is 'Stare' and here's my contribution:

I got my first DSLR camera a few weeks ago and this is one of the first pictures I took with it. The only willing model I could find to test my new camera on was my sisters cat and even she wasn't that keen!

TFL

Ruthie x

Sunday 2 September 2007

DCM Challenge - 3 Dai's

This weeks Daring Card Makers came from Lythan:

As a reward for all the brain power that went into the Little Extra this week, this is a simple one. From simple LythanWith a cryptic clue.Which, as I discovered to my embarrassment, when I laid it on the team, is only really possible to understand if you live in the UK. And even better, are Welsh.So... a trio of Welsh Barbers means that on your card you need to have 3 die cuts!( Dai is a common Welsh nickname for David and as there are a lot of Dai's around they are known by their jobs so a Welsh barber would be known as Dai Cuts. I'll get my coat.)


Here are a couple of cards I came up with.
This is for my Dad's birthday this week. The 3 dies are Sizzix Circles (red die), Cuttlebug Red Tag Sale letters and Cuttlebug Concentric Stars. The papers are digi freebies from the fabulous Kirsty Wiseman. The letters were cut from mountboard, painted with acrylic and then sanded.

Now for my second effort:


Dies: Cuttlebug Red Tag Sale (again) also cut from mountboard, coloured with ink and then covered with glossy accents; Cuttlebug flower and quickutz photo anchors. Papers are Basic Grey.

Thanks for looking, the photos are a bit pants as:
1) It's been dark and grey all day here so light is pants
2) I've got a new camera which I am wrestling with :)

Off now to wrestle with the camera a bit more!

Ruthie

Tuesday 28 August 2007

Button It - I'm back and blogging!

Well it's so long since I last blogged, but never mind. I'm back now with an entry for the latest Daring Card Makers challenge - Pushing Your Buttons!

Hi its Keryn here and it's my turn to set the dare this week. But before I do that thanks so much for the fabulous cards you've made for Jo's Frilly Dare and the Dots and Dashes little extra. We really enjoy looking at your cards.

I know you've all got buttons stashed away somewhere, whether they've been purchased at a cardmaking store or you thriftily snipped them off DH's old shirt. I'd like you to find those buttons and use them somewhere on a card. They can be real buttons, craft shop buttons, die cut buttons, faux buttons or another type of button, surprise us all.

Well it was my birthday last week and I had a little birthday get together the weekend before in the Lake District which included a trip to Go Ape in the Grizedale Forest. I wanted to make thank you cards for some friends who not only made the trip up to the lakes but also faced their fears on the Go Ape course (more of that later). So here's what I came up with, including Apes and Buttons :-)


I think the first one is my favourite which includes a 'faux' cargo net made from a piece of hessian jute. That card is destined for a friend who like me, found the cargo nets at Go Ape particularly challenging - they used to make it look so easy on the Krypton Factor (80's Granada TV show).

All cards are made using Basic Grey pashmina and poplin papers, brown parcel wrapping paper, and mini buttons and Prima flowers from Crafts by Carolyn. The monkeys are Cuttlebug - he is v.cute!
Now on to the reason for the Thank You cards - my birthday weekend in the lakes and the fantastic Go Ape course in the Grizedale Forest.

So Friday afternoon we (me and OH) headed off to the a fabulous campsite in the Grizedale forest:
Tent up, kettle on, it was all going so well (apart from me not holding the camera straight!) Later in the day we were joined by a couple of friends. We had a fab evening round the campfire, eating chilli; toasting marshmallows; drinking wine and beer, usual campsite stuff. Then, just before 9pm it started............................THE RAIN!!!!!!!!!!!!!!!!!!!! so we reloacted inside the tent for more drinks :)

On Saturday another friend joined us, and probably wished he hadn't as it was still raining, in fact it didn't stop until 9 am Sunday! (Saturday night we took the easy option and went to the pub).

Sunday morning when it finally stopped raining we headed off to the Grizedale visitor centre to meet up with my sister and a couple more friends, who had travelled up for the weekend's main event - Go Ape!
After a very comprehensive safety briefing from the Go Ape staff, we set off on our 3.5 hour adventure through the tree-tops of the Grizedale Forest. Here's some of the pics. (They don't show up that well small but you will get the general idea - ie it was HIGH, SCARY, and FANTASTIC FUN.

Part of the course:

This is me on the first big zip line. It's fantastic flying through the forest between the trees.


Me again on one of the cargo nets. This one was quite near the end of the course and I thought my arms were going to drop off by this point!


The little black blob you can see in the centre of the picture is my sister on the 'Tarzan Swing'. You had to attach yourself the swing and then

leap from the platform to the right of the picture. It then catapults you into yet another cargo net on the other side, which you have to climb to get to the next part of the course! All of this about 40ft off the floor (There are loads of videos on YouTube which people have made of this part of the course as it is very funny).


Well that's all for now.

TFL

Ruthiex


Monday 28 May 2007

Damp Bank Holiday

Well with this rubbish bank holiday weather there's nothing else to do but craft (and blog). This morning whilst blog hopping I found a new digi kit 'Metro to Retro' from the fabulous Kirsty Wiseman. I know the kits are designed for scrappers but I just had to download it and resize to a card friendly 6x6 in photoshop.

The design put me in mind of a couple of my Cuttlebug dies (asterisk and circle stamp frame), so they were the starting point for the card. Sounds easy eh? Well I'm the world's slowest and most indecisive crafter, but after a while I came up with this:
As mentioned previously the die cuts cirlcles and flowers (asterisks) are cuttlebug and all the papers are from Kirsty's Metro to Retro kit with added chalk ink on the edges. The flower centre brads were coloured using black nail polish as I don't have any black brads in my stash. The bulldog clip is from the same set I used on my Daring Card Makers 9 to 5 dare. It's amazing how they sat on my craft table unused for ages and now I can't leave them alone. The greeting is dymo tape and the stitching was done by hand. I love the effect of sticthing on cards but I don't do it often as it takes me ages.

Thank you Kirsty for such a fab kit - a great way to while away a bank holiday!


Here's a few more cards I did yesterday as the weather was pants:


Thanks for looking. Hope you've all had a good bank holiday.
Ruthiex

Friday 25 May 2007

Scratching from 9 to 5!

No, i've not got nits, it's a combination of the last two dares from the Daring Card Makers blog.

First is last week's dare by Tracie Bondgirl:

For this weeks dare, I dare you to "start from scratch" I want to you design a card with NO purchased/pre-assembled embellishments - that means no blooms unless you cut them yourself, no buttons, brads etc etc. I guess how easy this is depends on your usual style**insert evil laugh here**


I was a bit stumped with this one a first, but then after much paper shuffling I came up with this:


The flower is hand cut and the 'button' centre is a mountboard circle coloured with ink and glazed with glossy accents. The thread holes were punched with an eyelet punch.


The 'eyelets' were made by punching greyboard with a normal hole punch and then punched again with an eyelet punch to make the small centre holes. As with the button they were coloured with an inkpad and glossy accents added.

Papers are BG Phoebe, with added inking and scribbling.

Now on to this week's dare. I've had the day off work today so for once I've not been working 9 to 5, which is the title of Jo's dare for this week:

This week it's my turn (Jo) and I'm going to dare you to use bits and bobs from the office for your cards.It's been a while since I had a 'real' job - other than being a Mum and of course playing with bits of paper...Reminiscing... I would like you to make a card using some thing that you would normally find in an office environment. Such as... staples, paperclips, paper fasteners, file folders, library cards, hole punches, lined paper etc you get the drift.

Well, my job is office based, so I had no excuse not to have a go at this. I decided to make a card for my friend's birthday. It isn't until July so hopefully I won't lose it between now and then!

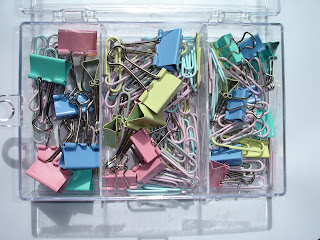
I've had this box of 'office supplies' on my craft desk for ages and decided they fit perfectly with the dare. I bought them from Asda ages ago, with the intention of using them on cards but had never used them until today.


With all those bulldogs clips begging to be used I decided the central embellishment on the card should be a mini clipboard (- inspiration/idea came from a topper Jo had produced for this month's Papercraft Inspirations mag). I found a bit of grey board (left over from the back of an a4 notepad) in a drawer and transformed it with a corner punch, some inks and some BG Blush into this:

It doesn't really show up well on the photo, but the inked board does look quite like wood so I was v.pleased with the effect.

Here's the finished card:

As well as the bulldog clip, other office supplies used are a paperclip and the ribbon is attached using staples (they don't show up well on the photo). The checklist was designed in photoshop. Paper is more BG Blush.

Finally, another card from me which is based on the midweek extra template, once again from Daring Card Makers:

Cheers

Ruthie xx


Sunday 13 May 2007

She said food ....... that obvioulsy means CHOCOLATE!

Well, I've done another dare from the Daring Card Makers blog. Here's the dare:

This week it's me (Kathy) setting the dare and I'd like you to make a card with a theme of FOOD!
So let's mull this one over.......You could make an invitation to a barbecue, dinner party, picnic, kids party etcIt could feature a recipe, ingredients, utensils, cookery quotations, poems or rhymes....It could have food depicted on it eg cupcake, CHOCOLATE, bowl of fruit , CHOCOLATE, sausages, CHOCOLATE,.....birthday cake....Hey, it could even have real food stuck on it.....OK, maybe not....as long as it's clearly got a foodie theme it's allowed.

Well, I took the hint and went for the CHOCOLATE option :) This is the card I made for chocolate loving friend:


The chocolate bar is made from fun foam, inked with a chalk ink pad. The lines were created by heating the foam with a heat gun and then pressing a kitchen knife into it. (I found the idea ages ago on a Christmas card project on Mad About Cards but never had the chance to try it out before.) The papers are Basic Grey, with added inking and scribbling - I'd like to say doodling but it's not that technical! The photo corners are Paper Mania.
I bought the BG papers yesterday - Phoebe 6x6 pad. I am only a recent convert to BG, but now I'm wondering why I waited so long to try them.
Thanks for looking, I'm off now to try and source some real chocolate!

Thursday 3 May 2007

A Bit of 90s Nostalgia


Well I'm back in blog land, it seems like ages since my last entry. I thought I had better pop by and leave an update, particularly as I have been tagged, but more of that later. So back to my post title of '90s nostaligia'. This is in honour of a gig I went to last Thursday, the fabulous Ocean Colour Scene.


The gig was a mixture of new stuff (album out this week) and quite of bit of their back catalogue which brought back a lot of memories from the 90s. Just the opening bars of the Riverboat Song transported me back to Friday nights getting ready to go out whilst watching TFI Friday. A brilliant way to spend a Thursday - the band were on top form.

Saturday was another day of musical entertainment - this time a spot of musical theatre in Manchester at 'The Producers'. It was a mother's day treat for my mum from me and my sister. Yes Mother's Day was a while ago but this was the earliest we could get decent tickets for the Saturday matinee. We had a lovely day. A nice lunch in a pub on Deansgate - fish and mushy pea butty and chips, yum (yes it was on the menu as a fish and mushy pea sandwich, it wasn't my own creation). Then we wandered through the very sunny City centre to the lovely Palace Theatre.

The show was absolutely brilliant. I'd never seen The Producers and only knew the vague of outline of the story, but what a treat it turned out to be. I laughed from start to finish and found myself humming 'Springtime for Hitler' for the rest of the day.

I have also managed to squeeze in a bit of crafting and done a couple of cards (which is a classed as a high level of productivity for me), but I haven't had a chance to take any pics yet so they will have to wait for my next post.

My crafting has been limited as I have been out enjoying the lovely weather, including tonight when I managed to get out on my bike for the first time this year. I had a lovey ride down the canal, I just wish I had taken my camera as the early evening sunshine was lovely.

Anyway, back to the start of this post and being tagged. I have been tagged by a few people, but Andrea (Frog) got in there first:

You have to list seven fact/habits about yourself then tag another 7 people, so here's my 7 facts:

1) I hate coconut, the thought of eating a Bounty makes me gag, yet strangely I love Malibu -don't know what that says about me ;-)
2) I passed my driving test at the first attempt
3)My first love was Andrew Ridgeley from Wham! I think it can be classed as unrequieted
4)My dream job is a florist but the early mornings would not be good for me
5) I love roller coasters - my favourite is The Grand National at Blackpool Pleasure Beach
6) My first pet was a budgie called Dougal (named after the Magic Roundabout dog)
7) I hate whistling, it drives me mad

So there you are my 7 facts. Most people have now been tagged, but if you read this and haven't, you have now so feel free to add 7 facts to your blog.

Cheers

Ruthie x

Friday 20 April 2007

I know it looks like a sewer.......................

.............but it's actually a well in a pub!


This was one of the photos from our girly night out in Lancaster last Friday - four of us hit the town and had a fab evening of food, beer and flavoured vodka (pear drops getting a thumbs up from all 4 of us. The well is in one of the rooms in the pub we started the evening in. It has a toughened glass sheet over it so you can do a 'walk of faith' type thing (hence the inclusion of feet on the photo). It really made me feel queasy, and that was at the start of the evening!

As the weather was fab on Saturday we were invited to our second barbeque of the year. Is that a record in April? We were still sat outside at 11pm, albeit with the help of heat from one of those chimnea fire things. Unfortunately I couldn't get too close to it as it was chucking out a few sparks and I wasn't wearing suitable footwear - namely my fab new Crocs. After a bad day at the office on Friday I decided I needed a bit of shoe therapy. I bought a pair of 'faux' crocs last summer but decided I really needed a pair of the genuine article. Yes, I'm at least a year behind the trend but who cares - I'm comfy (and look ridiculous if you ask my OH!). The flower and bee Jibbitz were a little extra spend on e-bay :-)

The weather was still fab on Sunday so I decided to make the most of it and get out in the garden. I was going to try and do a bit of crafting in the sunshine, but no matter how still I think it is the minute i take any card or paper outside it starts flying around like it's in a force 10 gale. So I took the opportunity to sort out my garden furniture - the annual sanding and teak oil session was Sunday's afternoon entertainment.


After enjoying the sunshine over the weekend I managed to squeeze in a bit of crafting during the week.

The first one is a get well card for a relative who's in hospital after a fall which resulted in a broken hip!

The papers are by polar bear, die cut stars are zip e slim, screw head brads are from Carolyn's and the lettering is quickutz ginger.

The next two are birthday cards for a friend who's birthday it was on Thursday. The first one was 'commissioned' by my sister with the brief "I want a skier with a pink drink in her hand". The birthday girl has just returned from her first ski-ing holiday and is known for her love of pink wine! Here's the finished card:

The doll is Sizzix die cuts with the addition of hand cut skis and a quickutz wine bottle. I was limited in the colours I could do as the doll die cuts were left overs from an e-bay purchase ages ago (I don't have the doll dies). The ribbon is from Paperchase and a peel-off from stash.


This is my card for the birthday girl:

Paper is Basic Grey Urban Couture. It's green and brown although it doesn't show up too well on the photo (I'm no David Bailey as have no doubt gathered). Blooms are from Dunlenm Mill. The flower centre is a flattened bottle cap (from Wilko home brew dept - not an expensive crafty one) and it's filled with a die cut piece of the background paper. The smallest Sizzix circle on the red die is a perfect fit for the centre of a flattened cap. Circle clip and ribbon is from Carolyn's. The sentiment is printed onto the background paper as I don't own any rub-ons.

Well that's all from me!

Ruthie x


Wednesday 11 April 2007

DCM Midweek Extra

This was the midweek extra dare from the girls over at Daring Card Makers:

It's time for our Little Extra - a midweek bonus task to keep you busy. This week we have a very simple recipe for you to followAll you need to do is make a card featuring 5 circles, 3 squares and 1 flower - that's it. Simple, eh? We're looking forward to seeing what fabulous ideas you come up with for this one

So here's my interpretation of the ingredients:

5 Circles: silver brads x 5
3 Squares: of mountboard cut using a Cuttlebug die and inked with black ink (used to mount the photos)
1 Flower: 1 photo of a pink flower taken by me, reproduced 3 times with the saturation levels altered in photoshop (3 for the price of 1 :-) )

Extra bit: Sentiment printed using dymo tape

And here's the finished card. it looks a bit squiffy on the photo but it is straight in real life - I think!!!! (Never mind it was just for fun)

Thanks for looking.

Ruthie

Monday 9 April 2007

Climb Every Mountain

Well I've had a fab Easter weekend. We spent Saturday night and Sunday with some friends who are part of the Bowland Pennine Mountain Rescue Team. Some members of the team had hired the team's Smelt Mill base in the Trough of Bowland and we were invited to join them for a barbeque on Saturday night and a lazy Sunday in the sunshine.


So this was home for the weekend:


Smelt Mill from the River ; View down the River ; Daffs in the garden


On Saturday night we barbequed in the garden, well the boys did, what is it with men and fire, albeit in this case gas powered fire? The food was good, as was the wine and beer. As a result Sunday morning wasn't quite as pleasant!

So much for a lazy Sunday. At lunchtime we headed off for a walk in the sunshine to Langden Castle which is about 3 miles away from the base. About a mile into the walk the mountain rescue team received a call on their radio to attend an incident on one of the local fells. As a result our walking party was reduced by about half, but we [the non team members] carried on, regardless, enjoying the lovely spring sunshine. The team members rejoined our group after they had returned from their call-out; they received a message en-route to say they were no longer required. Finally the full group made it to Langden Castle. Trading standards should really be contacted about the 'castle' part of the name. It's actually a stone cow shed in the middle of nowhere! I really should have taken a picture as it has to be seen to be believed - maybe next time :-)

After the walk, we went back to Smelt Mill for a rest and a nice cup of tea. Then it was on to the next part of the day's activities - climbing and abseiling. Smelt Mill has an indoor climbing wall and so I couldn't resist having a go.

After a couple of climbs up the wall my friend Julian suggested I try abseiling. I have climbed the wall before but never tried abseiling it. I didn't have a problem climbing up the wall, but somehow hanging on a rope 30 ft above the floor was a different matter. After a bit of persuasion I managed to make my way out of the door at the top of the wall, and more importantly got down in one piece! After the first nervous attempt I managed a few more descents. It has to be said coming down is a lot easier than going up, particulary as I had been feeling rather delicate earlier in the day. This is the second time I've been on the climbing wall and it really is good fun. I'm not sure how I would be on real rocks though.


We had a really good weekend, so I have made this card to send as a thank you to the friends who invited us, and the rest of the team who made us so welcome:


The colours haven't come out that well on the picture but the details are as follows:

- Paper: Basic Grey Sublime (the green), Basic Grey Mortifica (brown/gold)

- Card: Paper Mill Shop (a very good replica of the Bazzill texture)

- Die cuts: Quickutz

- Brads: Making Memories

- Lettering: Quickutz 'Ginger' font. The letters were cut from chipboard (well the card from a Xyron refil and double layered) and then inked and covered with Anita's 3D gloss. I got the idea for this style of lettering from a challenge on Carolyn's forum (view it here). The challenge was set by CarolM. For more of her fab work check out her Blog

- Finishing: stitching and inking on the edges.

Making the card was a pleasant way to spend a bank holiday Monday afternoon, particulary as I did it while watching 'My Best Friends Wedding': total chick flick, but Rupert Everett YUM YUM!

If anyone has read this I hope you enjoyed it!

Ruthie x

Friday 6 April 2007

I Dare You!

Well, i've finally got round to doing a dare from the Daring Card Makers blog. This week's dare came from Rhi - to make a card inspired by a piece of art.

This dare tied in nicely with a project I have been working on recently. For the last couple of weeks I have been trying to do Warhol style pop art prints using Photoshop. I feel like I've read a zillion tutorials on the web of how to do them and it was driving me potty. So today's dare inspired me to revisit my pop art project, and the insipration link which Rhi provided led me to yet another PS tutorial. Here's the result:


The mini in the picture is mine, although it took (quite) a bit of messing in photoshop to get rid of the background so I could pop art it. I'm still not 100% happy with the effect but it's nearly there. Once I get an image i'm completely happy with I'm going to get it transferred onto a canvas, which is why I started the project in the first place - the dare has been a happy coincidence.

I've kept the card very simple as I wanted the picture to be the main focus. I was toying with the idea of adding a sentitment. "Have a Cooper Birthday" crossed my mind during a moment of cheesiness, but I decided less is more :-) The only other embellishment, the screw head brads, are from Carolyn's.

I promise my next card will not involve a Mini (2 out of 3 cards looks a bit obsessive!).

Cheers

Ruthie


Happy Birthday Sis!

It was my little Sis' birthday on Wednesday. For her card I decided to use a challenge set by CarolM on the Craftsbycarolyn forum. It's an envelope card. I made it a few weeks ago when Carol set the challenge on the forum, but in true Ruthie fashion I only finished it off on Tuesday night!

To celebrate we went to a local Italian restaurant on Wednesday night for some scrummy pizza and a little too much red wine! A good time was had by all.


The photos aren't brilliant but I'm sure you get the idea! (I need to work on my photography skills).

The paper and flower shaped clips are from Paperchase (i love their double sided wrapping paper - such a bargain). Ribbon, brads and spiral clips are from Carolyn's.

Ooh that's another post done!

Cheers,

Ruthie x


Saturday 31 March 2007

Pimp My Mini!


Well this is my first ever attempt at blogging. The idea is that this blog will inspire me to make more cards, rather than just spending money on my crafty stash which as all crafters know is a problem :-) I don't know if anyone will read it but it's here for my amusement.

Anyway as this blog is dedicated to my alleged card making I think I'd better show a card. So here's a thank you card I made last week for a mechanic who has done some work on my mini recently.


He had a bit of a nightmare with one of the supposedly straightforward jobs so that's the reason for the card. As well as the nighmare job, he also fitted me a fab new sporty exhaust so my mini has been pimped! He is a mini addict so took the challenge of the work with suitably good humour which only comes with experience of working on Minis!

Card details:

Cardstock (including the orange corrugated): from Paper Mill Shop
Paper: Basic Grey 'Oh Baby Boy'
Mini: Stamp from Bladerubber (coloured with felt tip and heat embossed)
'Stitching': black fine liner pen and holes punched with a pricking tool (a tip I picked up from reading Jo Kill's blog)
Die cut letters and stars: Quickutz
Screw head brad: from Crafts By Carolyn (check out the forum on there too)

Well that's the end of my first ever blog post.