Saturday 30 October 2010

Hallowe'en Pumpkin Crafting


Just a quick post to show that i've not been totally neglecting my crafting.

I am rather obsessed with the Rocky Horror Show, and Rocky Horror Picture Show so when I saw a new Dr Frank-N-Furter pumpkin pattern on Zombie Pumpkins I knew I just had to have a go.  So here is he is:


And for those of you who aren't familiar with him in the flesh:


Not a bad likeness, even if I do say so myself!

Have a good weekend!
Ruthie x

Sunday 17 October 2010

A Hallowe'en Challenge (and more baking!)

Craft Fairy (Lisa) has launched a new die cutting challenge over on her blog to create a Hallowe'en themed card or project using a die-cutting machine.  There are not a lot of  challenges geared-up towards die-cutting specifically so it makes a nice change.

Here's my card:
Happy Halloween Card


To fit in with the challenge I used Nestabilities circle and scalloped circle dies and used a Cuttlebug embossing folder on the background paper. I also used a digital stamp from here, Fiskars edge punch, ribbon from my local market and a bit of pen stitching.

Get over to Lisa's blog and check out the dare!

As I said in the post title I have done a bit more baking.  Yes my cupcake baking addiction has not yet subsided!. After watching Hugh Fearnley-Whittingstall making rhubarb compote this week  I started thinking about rhubarb and custard and how it would make a lovely cupcake.  So yesterday I got busy in the kitchen and came up with my take on rhubarb and custard cupcakes:

Rhubarb and Custard Cupcakes

It's a vanilla cupcake with a portion of rhubarb and ginger compote inside and topped with custard buttercream icing.

The reason there is a tub of Bird's custard powder in the background is because that's what I used in the 'custard' buttercream icing.  Yes I am a child of the 1970s and absolutely LOVE Bird's custard (particularly on Jamaica Ginger Cake).

Also as a child of the 1970s Rhubarb (or should I say Roobarb) and Custard also has another meaning:

Thanks for looking.

Ruthie x

Sunday 10 October 2010

Birthday Boy Card and Cupcakes

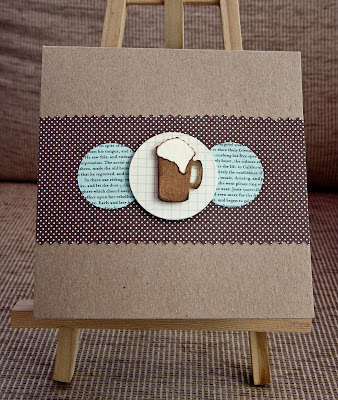
Yesterday was Mr Crafty Blogger's birthday.  I was tempted to buy a card due to my love of making men's cards, but I resisted temptation and made this instead:


Ingredients: Kraft card stock, Basic Grey Offbeat papers, Nestabilities circle and scalloped circle dies, lettering and tag cut using Cuttlebug Red Tag Sale alphabet set, garden twine from Wilko, eyelet and peel-off from stash, Tigerfrogg image, pen stitching.

Mr Crafty Blogger's favourite chocolates are Thornton's Alpinis which are are hazelnut and almond praline.  Following the success of last week's cookie dough cupcakes (particularly with Mr Crafty Blogger) I decided to try and make some Alpini cupcakes as a birthday treat.

I went in search of suitable recipes and came across this one for chocolate and hazelnut cupcakes on Afeitar's blog, which is originally from the Hummingbird Bakery cookbook.  I figured that it wouldn't be that difficult to work in a bit of almond, particularly as I had some almond flavouring in the cupboard.  I'm pleased to report they worked and here's the finished cakes:

I didn't follow the recipe for the sponge cakes, I just used my basic cupcake recipe, but the filling and topping is basically the same as the original, with just a bit of almond flavour added.

If anyone fancies trying them, here's my full version of the recipe:

 INGREDIENTS:
(Makes 12 standard size cupcakes)

For the cakes:
100g self raising flour
125g caster sugar
125g unsalted butter (at room temperature)
2 large eggs
25g cocoa
1/2 tsp vanilla extract
2-3 tbsp milk
120g Nutella spread (or other chocolate hazelnut spread)
Few drops of almond extract

For the buttercream icing:
250g icing sugar (sifted)
80g  unsalted butter (at room temperature)
25 ml milk
80g Nutella (or other chocolate hazelnut spread)
1/4 teaspoon almond extract

To decorate:
Alpini chocolates, or other pralines of your choice.


METHOD:

Cupcakes:

- Preheat the oven to Gas 6/200c (180c fan)

- Sift the flour and cocoa together

- Cream butter and sugar together until pale and fluffy

- Beat in the vanilla extract

- Beat in the eggs one at a time, adding a spoonful of flour/cocoa after each one

- Fold in the remaining flour/cocoa

- Add 2 or 3 tablespoons of milk (just enough to make the batter loose enough so it drops off a spoon)

 - Line a 12 cup muffin/cupcake pan with papers and fill each one 2/3 full with batter and bake for 15-18 mins, until the cakes are cooked.  (To test, stick a cocktail stick into the centre, if it comes out clean they are done.)

- While the cakes are baking, mix a few drops of almond extract into the Nutella.

- When the cupcakes are cooked remove from the oven and allow to cool on wire rack.  Once completely cooled cut a little circle out of each one and pop a small amount of Nutella/almond mix in.  Replace the cut piece of cake to reseal the top of the cakes (you will be left with something like this): 

(I found it easier to scoop a tiny bit of cake out once I had cut a 'lid' as this left more room for the filling.)


Buttercream icing:


 - Mix all the ingredients together in a free standing mixer, or with a hand held electric whisk until light and fluffy.

- Pipe or spread onto the top of each cake

- Add a chocolate on top to finish.


NOTES and VARIATIONS


I have specified using almond extract in the recipe.  If possible avoid using almond flavouring.  I only had almond flavouring in and I've found it gives a bit of an artificial boozy taste.

I have specified the recipe makes 12 cakes.  I actually got 15 out of the batter but it will depend on your cupcake sizes.

For a variation omit the almond flavour and top with a Ferreo Rocher chocolate in place of the Alpinis.  (It's worth noting that you only get 9 chocolates in the standard Thornton's bags so you either need to buy 2 bags or 3 extra loose chocolates).


Thanks for looking and happy Sunday,

Ruthie x

Saturday 2 October 2010

More Baking

I've had the house to myself today so I made the most of it by making a lot of mess in the kitchen!  I've made another Christmas cake (destined for my Mum and Dad) and these:

Cookie Dough Cupcakes


Cookie Dough Cupcakes

I saw the recipe on KevinandAmanda.com and knew I had to give them a try.  Mine aren't as perfect as Amanda's, and I need to tweak the cookie dough to cake mix ratio, but I am quite pleased with them as a first attempt.  I've not tasted the finished article as yet, but hopefully the cookie dough will still be nice and soft in the middle.

I'm off now to catch up with Strictly Come Dancing.

Enjoy your weekend,

Ruthie x

Wednesday 29 September 2010

Work In Progress

The weather is getting colder and damper and I can definitely tell I am back on my winter schedule.  My 'winter schedule' is nothing exciting, it mainly revolves around eating soup from one of the local bakeries for my lunch and spending my evenings attempting to knit.

I am by no means an experienced knitter, but I try.  Last year I managed a hat and this year I have decided on big chunky scarves.  The idea is that I will knit some as Christmas presents, but I need to do a prototype first (quality control and all that).  Last week I made a start and here's a quick pic of the prototype in progress:

The pattern is a free download from Ravelry and the finished product should look a little something like this.

I will still be card making over the winter but I sometimes find it hard work in the evenings with the lack of  light.   Knitting is something I can do curled up on the sofa with the TV on.  Choice of viewing for knitting will most probably be Mad Men on DVD.   I was a latecomer to the MM phenomenon but now I am obsessed!  I'll also be throwing in a bit of Strictly Come Dancing for good measure.  (As you can imagine Mr Crafty Blogger is delighted "that thing" starts again this week!)

Cheers

Ruthie x

Sunday 26 September 2010

It Worked!

Last night the christmas cake (from my last post) finally emerged from it's Jack Daniels sauna and here it is:

(not the best pic as it was taken last night in my kitchen so no natural light whatsoever)

It's a little lighter coloured than I expected but I think that's because there's no treacle in the recipe.  I am used to the ones my mum makes which I seem to recall use treacle.

Now I just need to wait until Christmas to see how it tastes!

Enjoy the rest of your Sunday,

Ruthie x

Saturday 25 September 2010

A Hallowe'en Challenge Card

I've recently started following the Ribbon Girl blog and they have recently launched their first challenge:


I'm probably a little bit predictable with this one, but I opted for a Hallowe'en theme:


Halloween Card


Halloween Card


Ingredients: Vintage canned pumpkin label from the Graphics fairy, Basic Grey paper, Nellie Snellen frame die, hand cut pumpkin, ribbon from local market, pen stitching, studio G alphabet stamps.


In addition to finishing this card today, I also had a very productive morning and made my first ever Christmas cake!  It's currently what can only be described as sweating in tin foil and Jack Daniels but here's a few shots of the work in progress from this morning:

Getting to grips with the recipe (from Feast by Nigella Lawson):

Well on the way:


Mmmm, ready for the tin (I love raw cake mix!)


Ready for the oven:
I have to say I wasn't convinced with the instruction to put a large collar of brown paper around the tin, I was sure it would set on fire in the oven.  Thankfully it didn't.

After I had finished scraping the bowl I offered Mr Crafty Blogger the chance to 'lick the bowl'.  His reply was "err no, it's got raw egg in it hasn't it?".    I was very surprised at his response, particularly as he was brought up in NW England during the 1970s where 'bowl licking' was practically a sport and one which most children could reach an olympic standard at!  He then proceeded to ask if I had eaten any of the mixture.  My reply "of course"!

Due to my cake mix eating activities this may be my last blog post (or so Mr Crafty Blogger intimated), if not I'll be back soon with a pic of the finished cake.  I can't post one now as the recipe instructs you to soak it with more booze and wrap in foil to cool, which is what it's currently doing.

Thanks for looking,

Ruthie x

Sunday 19 September 2010

Butterflies and Bunting

I've just come back from a week's holiday to hideous weather up here in NW England and so all I want to do is hole myself up in my craft room and play.

With this in mind, this morning I went on the hunt for a challenge to inspire me and this week's challenge on Daring Card Makers fit the bill perfectly:

This week it's me (Kathy) here to set the new dare and I'd like you to


Come Fly With Me

My theme is All Up in the Air, really ;-) - I'd like to see the main elements of your card being things that fly, flutter, hover or waft about "up there" in the sky.

The hideous weather I've come back from holiday to has made me crave sunny days and afternoon tea parties with bunting flapping in the wind and butterflies hovering over head.  So this is what I came up with:
Bunting and Butterflies Birthday Card
It's a card for a friend whose birthday is not until late October, by which time I think we will all be craving sunny days and blue skies!


Ingredients: Papers October Afternoon (Fly a Kite range - even that fits the dare!), Quickutz alphabet dies, Cuttlebug cake die, Nellie Snellen frame die, American Crafts ribbon, pen stitching, garden twine from Wilko, punched butterflies.


Just a note on the 'stitching'.  One of the comments on my last post asked if it was real stitching on my cards.  It isn't!  After thinking I had broken my sewing machine the only time I tried to stitch a card I always stick with my pen stitching method: piercing the card/paper with a map pin and then drawing in the 'thread' with a fineliner pen.  (It's much less stressful.)


As I said at the start of this post I've just come back from holiday and I can say there where we were there was no shortage of sunny days and blue skies as Mr Crafty Blogger and I spent a fantastic week on the beautiful Greek island of Santorini.  I don't want to bore you all with the hundreds of pics I took so here's a storyboard of just a few of them:

Santorini, September 2010
(storyboard created using a template from Coffee Shop)

We stopped at THIS fantastic hotel in the capital Fira (or Thira).  Not only were the facilities excellent we also had amazing views of the Caldera (volcano) and the sunsets which Santorini is famous for.  (I took the photo on the top right of the storyboard from our balcony!)


Although we stopped in Fira, we managed to get around the island very easily by bus, including a  number of trips to the beautiful (and very photogenic) village of Oia which is where three of the storyboard photos were taken.


I promised not to bore you with the photos, but before I sign-off I just want to share one of my favourite shots from the week:
Hotel Pool
If you are interested I have put a few more shots on my Flickr.

Thanks for looking,

Ruthie x

Sunday 5 September 2010

A Nice Surprise

I popped over to Lisa Craft Fairy's blog this morning to check out this week's die cut challenge and was very surprised and delighted to learn my card from last week was awarded card of the week.  If you read this Lisa, thank you,  I'm glad you liked the card.

Anyway on to this week's challenge which Lisa has set which is to make a card featuring a scalloped square die cut. I wanted to do a card using the scalloped square as a frame but  I don't have any large Nestabilities square dies or punches.  As a substitute I modified a Nellie Snellen rectangle into a square and came up with this:

Ingredients:  Nellen Snellen die, Cuttlebug cake die and embossing folder, My Minds Eye papers, Nestabilities oval dies, Quickutz number dies, ribbons and pins from stash and finally pen stitching.

Yesterday was my Dad's birthday and so I had to venture into my least favourite card making genre: Men's cards!

Thankfully The Graphics Fairy came up trumps with a suitable image and here's the finished card:


I added 'Dad' to the Graphics Fairy image in Photoshop and printed it onto some canvas printer paper to give it a more vintage feel.

The other ingredients: October afternoon papers, Sizzix tag die stamped with a Papermania stamp, circle clip from stash, inking and pen stitching.

Thanks for looking.

Ruthie x

Wednesday 1 September 2010

A New Challenge

Lisa (Crafty Fairy) has launched a new challenge over on her blog.


Welcome to Shape of the Week Sunday!
I decided to set a Die Cutting based challenge on my blog every week, as there does not seem to be many die cutting challenges about so i thought this may inspire people!!

So my challenge to you is to make a card using a die of a scalloped circle - there are tons out there and i think it is a popular die!!

This challenge gave me the kick up the bum I need on Bank Holiday Monday to make my Mum's birthday card:


Ingredients:  Scalloped circle dies (large one is Nestabilities and small  one under the button is a Cuttlebug die), October Afternoon papers, Cuttlebug butterfly die, home-made journalling spot (made in Photoshop), Cuttlebug letters dies, mini bulldog clip from Paperchase, button from stash, pen stitching.

After I finished the card on Monday we headed out to Morecambe for a walk along the prom and to make most of the unusually nice weather.  It was also a good opportunity for me to practice my photography. Here's a shot I took when we walked down the Stone Jetty looking back towards the Midland Hotel:

Of course a trip to Morecambe wouldn't be complete for me without my favourite ice-cream treat, a Snowball Topper.  Although this has featured on my blog before I still had to take a photo of the 2010 version!
While I was queueing for my ice cream I managed to get another shot of the fabulously retro Sunset Ices ice-cream van:
(The composition isn't brilliant on this one, but I was limited as I was in the queue!)

Thanks for looking,
Ruthie x

Saturday 28 August 2010

Cameras, Chester and a Card

***Warning, picture heavy post***

Last Sunday was my birthday and as a present Mr Crafty Blogger paid for me to do a 1:1 photo course with the photographer and crafter extraordinaire the wonderful Kirsty Wiseman.

So last Friday I headed off to meet Kirsty.  I had a fantastic day and learnt loads about portrait photography and editing which enhances rather than destroys photos.  Although I could already shoot semi-auto and manual Kirsty managed to increase my confidence and prove that with a few tweaks I can get some great shots from my camera.  Here's a couple of shots from the day:

First this is me taken by Kirsty with my camera (pic from Kirsty's blog):


and here's one I took of Kirsty:


If you have a DSLR camera I cannot recommend the course highly enough!  If you are a beginner to DSLR photography it will save you months of reading manuals, tutorials and books.  If you know a bit more about it like I did it will increase your confidence and teach you lots of invaluable tips and tricks.

On Saturday I celebrated my birthday with friends and a trip to Chester Races.  A while ago I blogged about my intention to make a dress and I am pleased to report that I did make one and wore it to the races.  (It nearly didn't make it as I was still hemming it at 12.30am on Friday morning).

Here's a pic of me (on the left) and a friend waiting for the train to Liverpool.  It has to be said we got some funny looks when we boarded.


Once we got to Lime Street station there were a lot more race-goers knocking about so we blended in a bit more.  By the time we got to Chester we looked normal and after a lovely pub lunch we joined the hoardes of people heading to the course:


I had never been to the races before and my previous betting experience was limited to an annual flutter on the Grand National.   However I did manage to pick one winner (out of 8 races) and I did finish 'up' by £2.50.  Mr Crafty Blogger did significantly better, backing 4 of the 8 winners.    Here he is "studying the form" or whatever you do when you don't pick horses by their name or the jockey's silks:

(photo was taken on my mobile.  If you have an Android phone download Vignette, it's great fun)

Fortunately Mr Crafty Blogger's success meant the drinks were on him!


Finally as this is a craft blog I thought I had better share a card.  This is the thank you I made for Kirsty following the photo course:


Ingredients:  Basic Grey Offbeat paper, Quickutz and Cuttlebug alphabet dies, mini bulldog clip from Paperchase, Fiskars threading water punch.


Thanks for looking,
Ruthie x

Saturday 14 August 2010

It's Tree-mendous.............

...... I've made a Christmas card, and it's only August!

It's all Jo's fault over at Daring Card Makers:


Tree-mendous!

I would like to see cards this week featuring a tree! Some of the Daring Cardmakers may have groaned slightly when I mentioned Christmas trees(Kathy!) but it doesn't have to be a festive tree, green trees, apple trees, stamped trees, sticker trees, paper pieced trees - anything goes, as long as it is a tree!

I recently bought the Basic Grey Offbeat papers which put me in mind of Christmas decorations in a very retro 1970s way.  Perfect, I could make a Christmas card without having to delve into anything too snow covered and festive:
Christmas Tree Card

Christmas Tree Card (2)

Ingredients: Paper - Basic Grey Offbeat, Nestabilities labels, circles and scalloped circle dies, Sizzix Sizzlits Tree die, pom poms from Aberkan, ribbon and brads from stash.

The layout of the card was based on another card I made earlier this week which has a much more summery feel!:

icecreamcard

Ice Cream Card (2)


Ingredients: Papers - My Minds Eye (magazine freebie!), paper-pieced ice cream made with a mixture of hand cutting and Nestabilities dies, Nellie Snellen frame die, pom poms from Aberkan, ribbon from stash, inking and pen stitching.

Thanks for looking,

Ruthie x

Sunday 8 August 2010

Sculpted Paper Roses

You will have probably noticed that sculpted paper roses are everywhere at the moment.  Prima do them and YouTube is full of tutorials on how to make them.

I started having a go at making them a couple of weeks ago with very limited success (by "limited" I actually mean NO success).  However, yesterday I had a bit of a breakthrough and managed to make this:

Paper Rose

Sculpted paper rose


Most tutorials rely on using a 6 petal flower punch or die which I didn't own so my early (failed) attempts involved hand cutting the flowers.  This works well if you are very good with scissors, but unfortunately mine looked like I done them blindfolded with blunt scissors!

After trying and failing with the scissors I went punch/die hunting.  I ruled out getting a punch as they cost about £10 and I find their use quite limited.  A die seemed a more sensible option as I have a Cuttlebug so next stop was the Sizzix range.

I decided that the new Sizzix Tim Holtz Alterations Tattered Florals die was what I needed.  Unfortunately these dies seem to be in pretty short supply and are going for silly money on Ebay so no luck there.

Luckily during my Sizzix hunt I stumbled across this die set from Marianne D:
141454-lr0131.jpg


Not only is it perfect for making paper roses but I will also get loads of other uses out of it as a normal die. 

Anyway, enough of my shopping, back to the paper roses.  As you may have gathered I cut the petals and leaves using the die.  Both are cut from My Minds Eye paper which I stuck together to make double sided.  The method for assembling the rose was based on a hybrid the following tutorials:

Splitcoast Stampers Tutorial  (this one uses the elusive Tim Holtz Die)


To finish the leaves I curled them round a pencil like the flower petals.

Thanks for looking and sorry for the slightly arty pics. Can you tell my latest obsession is my new Android phone and the Vignette app!

Ruthie x


Sunday 11 July 2010

A Twihard Birthday

Well Twilight mania  has well and truly passed me by.  I've not read any of the books or seen the films (I'm much more of a True Blood girl).   However, I happen to know a young lady who is Twilight mad and has a birthday coming up so it calls for a suitable birthday card.

As I said, I'm not that well up on the adventures of Edward, Jacob or Bella so a bit of interweb research was required.  One of the first things I found was THIS amazing cake, inspired by the Twilight series book covers.

The cake provided suitable inspiration and this is what I came up with:


Ingredients: Hand cut and paper-pieced chess pieces and apple; Nestabilities labels die; Cuttlebug embossing folder and corner die; ticket made from a Sizzix ticket die and text printed in Photoshop; flower and ribbon from stash, heart pin from local market, Poundland self adhesive gem, patterned paper download from Summertime Designs and a bit of inking to finish.

After reading all the stuff on the interweb I am tempted to give the books a go!

Thanks for looking,

Ruthie x

Wednesday 23 June 2010

Boys, Boys, Boys!

All I seem to be doing at the moment is male cards which is driving me mad!

Last weekend was Father's Day so here's the cards I made for my dad and father in-law

My dad:


Ingredients: All papers are October afternoon, faux chipboard letters made with scrap cardboard and Cuttlebug dies, hand-cut and paper-pieced boat.

My father in-law:

Ingredients: All papers are October afternoon and I dug out the old male standby of the Quickutz beer mug die.

Even new babies did not provide any escape from the male card making with two new baby boys putting in an appearance in the last few weeks.  It's a good job I recently invested in the cuttlebug aeroplane die!

Papers are October afternoon (just for a change!), Cuttlebug aeroplane die, Making Memories trim, hand written greeting, buttons from stash and a bit of pen stitching.


Ingredients: Paper is from an old DCWV pack, background embossed with a Cuttlebug embossing folder, felt plane cut with the Cuttlebug die, pom-poms from Aberkhan and gingham ribbon from stash.

Thanks for looking.  I'm off now to make another card, and yes it's for a bloke!

Ruthie x