Saturday, 5 February 2011

Shoes, Bags and a Bit Of Dressmaking

Well I'm not really a girly girl but this post will probably make me look like one!

As most men will tell you women have a thing for handbags and I must admit I have a bit of a bag problem.  Not ordinary handbags though, I love camera bags!  I even use a non-padded Crumpler bag as my work handbag.

The problem I have with my camera bags is they are not always suited to just carrying about without advertising the fact that I have a camera with me, and in addition to that I usually end up taking another handbag with me.  That was until this morning when this came into my life:


a Jill-e for Pentax ladies camera bag.

Jill-e make bags, but like all ladies camera bags they are quite expensive and aren't widely available in the UK so when I saw this brand new on e-bay for £40 I knew I had to have it.  (It's not from the Jill-e range it's one they designed for Pentax cameras.)

It's padded and has compartments inside so I can fit my camera, lenses, flash and also my day to day stuff in there like my phone, purse etc (which I often struggle with in my other bags):


I also had another parcel to collect this morning, which totally reinforces the female stereotype; new shoes.

I stumbled across Afeitar's blog when I was looking for cupcake recipes and have been following it ever since.  As well as posting about food and baking she also blogs about the cute outfits she wears.  One of her entries was about some lovely shoes she had bought in Duo.  

When I failed to find some new shoes in town I decided to check out Duo online and I'm so glad I did because I found these in the sale:

They were reduced from £80 to £20 so I couldn't resist.

A girly post wouldn't be complete without a frock so in true Blue Peter style here's one I made earlier:


It's a dress I made (and blogged about earlier in January).  This is the final finished version with the zip in and hemmed.  It's from a Vogue pattern (ref v8470).

I wore it to a vintage dancehall event last weekend and I am pleased to report it survived the evening and remained intact.  I also used the event to practise my photography skills and I managed to get a few decent shots.  This is one of my favourites which is of the dance teachers in action:


I also have this event to blame for me going hunting a camera [hand]bag as at one point in the evening I managed to velcro my camera bag to the netting on my underskirt.  Well that's my excuse for needing a bag and I'm sticking to it.

Thanks for looking.

Ruthie x


Sunday, 23 January 2011

Birthday Card and A Bit Of Beading

Here's a couple of recently completed crafty projects.  First up is a birthday card I made for my friend:


Please excuse the poor photos.  They were taken in my kitchen after it had gone dark (roll on summer!)

Ingredients:
Dies: Cuttlebug butterfly and alphabet; Sizzix ticket: Nestabilities circle and scalloped circle.
Felt and button from Paper and String
Mini bulldog clip from Wilkinsons
Ribbon, flower and brad from stash
Papermania birthday stamp
Papers from GCD studios (Homespun Chic)

I've also done a tiny bit of beading and made a couple of these:


One has gone to a fellow crafter/blogger and mine is going to be attached to my camera bag.

As well as making camera themed charms I have been using my real camera and keeping up with my project 365, although I am a bit behind with updating my 365 blog!  I must admit its a bit of a struggle to get pictures with the dark evenings but I'm hanging in there (and learning a lot about using flash). 

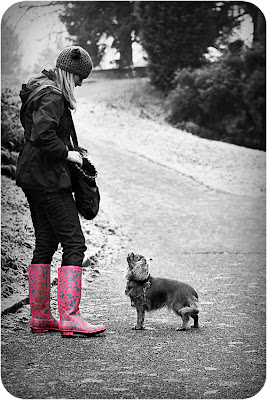
Yesterday I got the chance to get out and about with my camera and I went for a walk with a friend and her very cute dog.  Despite thick fog and frost I managed to get a few reasonable shots.  My favourite, and therefore my 365 for yesterday is this one:


Thanks for looking,

Ruthie x


Sunday, 9 January 2011

Work In Progress: The Sewing Machine's Out Again!

After the (reasonable) success of my races dress last year (here), I decided to get the sewing machine out again.  The Vogue pattern I made the dress from has a number of variations on it so I've decided to have a go at the halterneck style. It's not going too badly and all it needs now is a bit of finishing and the zip going in:

The spots are actually red, but I was messing with effects in Vignette so they've come out pink on the pic.

I must confess there is a big underskirt on the mannequin which I didn't make.  It's one I bought with another 1950s style dress.

Thanks for looking,

Ruthie x


Wednesday, 5 January 2011

Happy New Year

Happy New Year to all of you.  Hope you had a lovely time over the festive season.

I've no excuse for my recent absence, except for being a bad blogger!  It has to be said I've also been quite a bad crafter and my mojo had very much left the building!   Even Christmas card production was very limited this year.  Why do you always get the urge to do Christmas cards in August and then it evaporates by mid October?

Anyway, it's a New Year and I will craft.  To prove it here's my first card of 2011.  Nothing spectacular, but hey I made it!


Ingredients: Scruffy teddy die cut from ebay, K&CO paper, Cuttlebug red tag sale alphabet dies.


As well as venturing into my craftroom (briefly), I've also started another project and blog.  I've finally jumped on the bandwagon and started a photography 365 (photo a day) project.  If you are interested in photography take a look here The Crafty Blogger's 365.  If you are doing a 365 yourself please leave a comment over there as I'd love to take a look.

Saturday, 30 October 2010

Hallowe'en Pumpkin Crafting


Just a quick post to show that i've not been totally neglecting my crafting.

I am rather obsessed with the Rocky Horror Show, and Rocky Horror Picture Show so when I saw a new Dr Frank-N-Furter pumpkin pattern on Zombie Pumpkins I knew I just had to have a go.  So here is he is:


And for those of you who aren't familiar with him in the flesh:


Not a bad likeness, even if I do say so myself!

Have a good weekend!
Ruthie x

Sunday, 17 October 2010

A Hallowe'en Challenge (and more baking!)

Craft Fairy (Lisa) has launched a new die cutting challenge over on her blog to create a Hallowe'en themed card or project using a die-cutting machine.  There are not a lot of  challenges geared-up towards die-cutting specifically so it makes a nice change.

Here's my card:
Happy Halloween Card


To fit in with the challenge I used Nestabilities circle and scalloped circle dies and used a Cuttlebug embossing folder on the background paper. I also used a digital stamp from here, Fiskars edge punch, ribbon from my local market and a bit of pen stitching.

Get over to Lisa's blog and check out the dare!

As I said in the post title I have done a bit more baking.  Yes my cupcake baking addiction has not yet subsided!. After watching Hugh Fearnley-Whittingstall making rhubarb compote this week  I started thinking about rhubarb and custard and how it would make a lovely cupcake.  So yesterday I got busy in the kitchen and came up with my take on rhubarb and custard cupcakes:

Rhubarb and Custard Cupcakes

It's a vanilla cupcake with a portion of rhubarb and ginger compote inside and topped with custard buttercream icing.

The reason there is a tub of Bird's custard powder in the background is because that's what I used in the 'custard' buttercream icing.  Yes I am a child of the 1970s and absolutely LOVE Bird's custard (particularly on Jamaica Ginger Cake).

Also as a child of the 1970s Rhubarb (or should I say Roobarb) and Custard also has another meaning:

Thanks for looking.

Ruthie x
Sunday, 10 October 2010

Birthday Boy Card and Cupcakes

Yesterday was Mr Crafty Blogger's birthday.  I was tempted to buy a card due to my love of making men's cards, but I resisted temptation and made this instead:


Ingredients: Kraft card stock, Basic Grey Offbeat papers, Nestabilities circle and scalloped circle dies, lettering and tag cut using Cuttlebug Red Tag Sale alphabet set, garden twine from Wilko, eyelet and peel-off from stash, Tigerfrogg image, pen stitching.

Mr Crafty Blogger's favourite chocolates are Thornton's Alpinis which are are hazelnut and almond praline.  Following the success of last week's cookie dough cupcakes (particularly with Mr Crafty Blogger) I decided to try and make some Alpini cupcakes as a birthday treat.

I went in search of suitable recipes and came across this one for chocolate and hazelnut cupcakes on Afeitar's blog, which is originally from the Hummingbird Bakery cookbook.  I figured that it wouldn't be that difficult to work in a bit of almond, particularly as I had some almond flavouring in the cupboard.  I'm pleased to report they worked and here's the finished cakes:

I didn't follow the recipe for the sponge cakes, I just used my basic cupcake recipe, but the filling and topping is basically the same as the original, with just a bit of almond flavour added.

If anyone fancies trying them, here's my full version of the recipe:

 INGREDIENTS:
(Makes 12 standard size cupcakes)

For the cakes:
100g self raising flour
125g caster sugar
125g unsalted butter (at room temperature)
2 large eggs
25g cocoa
1/2 tsp vanilla extract
2-3 tbsp milk
120g Nutella spread (or other chocolate hazelnut spread)
Few drops of almond extract

For the buttercream icing:
250g icing sugar (sifted)
80g  unsalted butter (at room temperature)
25 ml milk
80g Nutella (or other chocolate hazelnut spread)
1/4 teaspoon almond extract

To decorate:
Alpini chocolates, or other pralines of your choice.


METHOD:

Cupcakes:

- Preheat the oven to Gas 6/200c (180c fan)

- Sift the flour and cocoa together

- Cream butter and sugar together until pale and fluffy

- Beat in the vanilla extract

- Beat in the eggs one at a time, adding a spoonful of flour/cocoa after each one

- Fold in the remaining flour/cocoa

- Add 2 or 3 tablespoons of milk (just enough to make the batter loose enough so it drops off a spoon)

 - Line a 12 cup muffin/cupcake pan with papers and fill each one 2/3 full with batter and bake for 15-18 mins, until the cakes are cooked.  (To test, stick a cocktail stick into the centre, if it comes out clean they are done.)

- While the cakes are baking, mix a few drops of almond extract into the Nutella.

- When the cupcakes are cooked remove from the oven and allow to cool on wire rack.  Once completely cooled cut a little circle out of each one and pop a small amount of Nutella/almond mix in.  Replace the cut piece of cake to reseal the top of the cakes (you will be left with something like this): 

(I found it easier to scoop a tiny bit of cake out once I had cut a 'lid' as this left more room for the filling.)


Buttercream icing:


 - Mix all the ingredients together in a free standing mixer, or with a hand held electric whisk until light and fluffy.

- Pipe or spread onto the top of each cake

- Add a chocolate on top to finish.


NOTES and VARIATIONS


I have specified using almond extract in the recipe.  If possible avoid using almond flavouring.  I only had almond flavouring in and I've found it gives a bit of an artificial boozy taste.

I have specified the recipe makes 12 cakes.  I actually got 15 out of the batter but it will depend on your cupcake sizes.

For a variation omit the almond flavour and top with a Ferreo Rocher chocolate in place of the Alpinis.  (It's worth noting that you only get 9 chocolates in the standard Thornton's bags so you either need to buy 2 bags or 3 extra loose chocolates).


Thanks for looking and happy Sunday,

Ruthie x